Tag: gallery

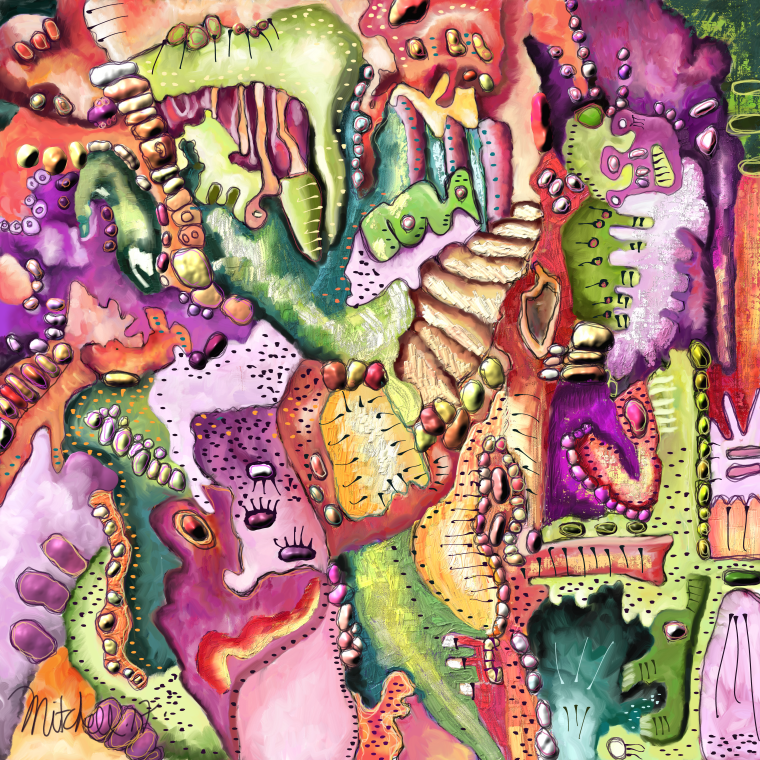
Somebody Loves Me

This is my latest painting done in Corel Painter 2018 and Rebelle by Escape Motions.

I started it in Rebelle which is a fabulous app that mimics watercolors. It acts exactly like you are painting with real watercolors! Absolutely amazing. I use it to make drips. Which Painter just can’t do.

I ended up covering up all the drips but I left some of the watercolor blending. It’s really so subtle and wonderful.

In Painter I used acrylics to paint in textures. You get textures based on which papers you choose. Then you adjust your brush settings to the amount of paper texture you want.

After that I moved on to my present favorite thing to do. That is add liquid inks. They paint on their own layer. That’s because their layer had these special settings where you can tell the ink to become thick. Which I did. So that’s the lines that are standing up. Also the dots on those lines.

I finished with regular inks.

A very fun piece to work on.

Definitely this piece was an adventure for me.

Enjoy your day!

Kino Glitch A New App

This last week a new app was released for iPhone and iPad. It’s called Kino Glitch. $1.99 at the App Store.

For those of you unfamiliar with Glitch apps, they’re meant to pretty much destroy your photo or drawing.

But this app is different. You have quite a bit of control over it. It’s different from any Glitch app I’ve ever used.

You choose the type of grid you want. Then you can adjust the size of the grid and how much Glitch effect comes through the grid. I chose none for this.

Then you can add a background and overlay.

You can also take your fingers and start moving the piece around. This is proving to be great fun.

The developer seems responsive to problems.

For anyone interested, I own a page on Instagram that features all kinds of photography, edits and art. If you would like to be featured, just tag to #BPA_Arts.

Enjoy your day!

I’ve Seen You Before

I've Seen You Before

I’ve Seen You Before

This is a painting that I did in Corel Painter.  I promise I won’t bitch about Painter or tech support at Corel.  Actually, in Painter 2018, things are going very smoothly.  Painter released in this version some stability to the application that seems very nice.  They also released for their trick to get you to buy it and/or upgrade a thing called thick paint.  They claim this looks like real paint.  Well hold it, Corel, what have we been using all these years?  Has our paint not looked like real paint all along?

Anyway, maybe this looks more like real paint.  I’m just not sure.  But boy is this stuff thick.  It is like painting with gloop.  I initially stuck my nose up at it and said no way am I painting with this stuff.  Not only because it was gloop but because it has its own separate layer.  It has a separate layer that does not act like a real layer.  So it is isolated.  It will not do many of the things a layer should do.  Plus the brush engine for the thick paint has a lot of controls to figure out.

In the past, Corel rolls out its latest trick brushes and then the next year it acts like it never heard of these brushes.  You are left holding the bag as to these brushes.  Well, why should I learn the complex brush engine of these brushes if Corel is just going to move on to some other trick brushes next year?

Eventually, when I took Skip Allen’s Introduction class, I came to love the brushes Skip made and I used some of these brushes.  But, I’m holding off judgment on them.  I’m not embracing them yet because I’m concerned Corel will not develop them further in the future.  For example see the Dynamic Speckle Brushes that were developed a couple of years ago.  They have great potential. But still need some tweaking.  Hello, Corel, are you ever going to tweak those brushes?  No.  The program is full to the brim of brushes that need a tweak here and a tweak there.

Anyway, I bitched about Corel Painter.  I guess it’s the best thing out there, but they sure can make a person angry with their shortcomings.

This painting I did with my thick paint brushes that I was in the process of making before I knew Corel was going to come out with thick paint brushes.  I started working with the impasto brushes to see how thick I could make them and have them look like real paint.

In the impasto control panel you can pick the depth method.  It is right below the Draw To box.  The Draw To box is where you pick Color and Depth for impasto.  I swear I have never noticed the Depth Method box before.  Probably because the print is so small and there are so many options in Painter.  There is always something new to discover.

Anyway, I started using Paper for Depth Method and it opened a whole new world in Impasto.  Wow!!!  I have a huge collection of papers that give me lots of different depths.  But even if you don’t, just using Painter’s default papers give you a huge variety of textures.  This is especially true if you adjust the contrast and brightness to the paper.  I take the contrast up and bring the brightness down usually.  I believe that Painter reads the dark areas of paper.  Or else it reads the white areas.  But, I’m pretty sure it reads the dark areas.  But experiment for yourself if you need to actually know.  The other adjustments you can make to the paper are the paper scale which can be very important.  Then there is an adjustment for rotation which can play an important part.  Then new to Painter on the grain setting is the Random Grain Rotation setting and the Random Grain Position setting.  I really like the first one.  It makes your strokes on a piece of paper look very real.  Without this setting, you are just repeating a digital pattern.

Be sure to have Grain Expression set to pressure.  Then, and this one I consider essential, be certain that you have set the Brush Calibration for the individual brush.  I think it is essential to do this.  There are many that believe that global brush calibration is ok.  That just is not true, in my opinion.  Set Brush Calibration for every brush.  It makes a huge difference.

I painted this picture with some of my new impasto brushes.  While I was doing that I started goofing around with Liquid Inks.  I then remembered that if you went into the layer settings for Liquid Ink, it would cause the Liquid Ink to become thick and raise up and become 3D.  Wow!!!  Awesome!

OK, Painter really is an awesome app!!!!  It does some awesome things.

So then, I decided, I would have to add some of the thick paint that I wasn’t liking so much.  So grudgingly I put some on here and there with the fabulous brushes that Skip made (see my earlier blog for information on the Intro Class to 2018).  All in all, this was a really fun painting to do.

Oh!!!!  I have to tell you, I have fooled around with this painting since 2014!  I have repeatedly tried to paint it with nothing but failure!  But I got it out this time, now in 2017, and it just came together.  So, never give up on a painting, no matter what.

If you are interested in my brushes and want them, drop me an email.

Kerry


Gladly Yours

Here is a painting that I did in Painter.  Yes, I actually did a painting in Corel Painter.  When I last posted a painting from Painter, I was probably struggling with Painter 2016 in all of its bugginess.  It had the absolute worst brush lag you could imagine.  Someone from Painter was allegedly helping me.  I use that word lightly because after he found out I had a very expensive computer and all my software was up-to-date, he just quit speaking to me.  He disappeared!  This is after asking me to be a beta tester.  He just fell into a black hole.  His name is Steve.  Where are you Steve?  Where all Corel Painter people go when they have to admit that it is their application that is at fault.

In some black hole.  I hope it smells bad there.

Anyway, Corel released version 2017, guess what the brush lag miraculously disappeared!  Wow!  So, it wasn’t my computer, it wasn’t my brushes, it wasn’t my fault.  Now, eight months later (are you kidding me, they can’t even wait one year for an update????) they released 2018.  That was in August.  In August of 2017, they release a version called Painter 2018.  They are getting ridiculous.  But, of course, I purchased it.  There were some updates I wanted.

Skip Allen was giving his annual (soon it will be semi-annual at the rate Corel is going) class at the Digital Art Academy.  You can check out his blog here.

You can check out the class here.  Skip’s class was awesome.  I think you can still sign up for it, I’m not sure.  I’ve taken his Intro Class to Painter since Painter released X3, the 2013 version. This was by far the very best class ever.  We had a blast in class and learned so much.  Skip is an awesome teacher and spends endless time preparing videos and answering questions.

This painting is a multi-media one.  I used watercolors.  I never use watercolors in Painter, but I broke that rule for class and did.  Then I also used acrylics.  I had a lot of fun.  This is an abstract that is unlike most of my abstracts.  I used the watercolors to get the paper textures in the various areas.  It is an interesting technique that I plan to use again.


A New Painting


Here’s a painting I just finished on my iPad Pro in my favorite app, Procreate.

I had thought I would get back to painting on my computer after a nine month hiatus due to the house remodel. But I’ve entered some kind of computer hell. I tried to get one drive changed to a larger one. They screwed that up. Then the next guy held my computer and wouldn’t work on it. But he refused to return it to me! I finally got it back. But now, it’s taking forever to get it fixed!
All because the first place did not push a button in a software app! Grrr!
I should learn to do this hardware stuff myself.

Kaleidoscope Fun In Painter

Karen Bonaker put up a video at DAA Facebook on using the new selection brushes in Painter.  I took off with her suggestion and made these two pieces.  You can check out the DAA here.

The selection brushes are really interesting.  For those of you familiar with digital art, they are the equivalent of marching ants, but you paint them on.

So, I went to Painter’s kaleidoscope feature and turned that on and painted a kaleidoscope with the selection brushes.  Then I painted into the selections or I chose invert and painted outside the selections, depending on the effect I wanted.

Then when I was done, I took the pieces into my iPhone, and used either DistressedFX, Mextures or Shift and gave them a background to tighten them up.

These were a blast to do, and I thank Karen for giving us this idea to use the selection brushes.

Corel released Painter 2018 about a month ago with some very interesting features. I was not going to update this time around.  Corel did not even wait a year to release this update.  To me that is ridiculous.  Once a year is enough for updates.  But in looking at the new features, I decided to go ahead and update.

I am taking Skip Allen’s class at DAA to learn how to use the new features.  We are having a blast in class.  You can check out Skip’s blog here.

Did You Really Say That


This is a painting that I started about two years ago.  It gave me nothing but grief.  I could see the eye in the main face just about in the center of the piece, but I could not get it to work.  I kept struggling with this piece, but nothing would work.  It just looked ugly.  I would go to other areas in the painting to work, and things just got worse.

Finally, I just gave up and put it away.  I have learned to never throw away or in my case of digital paintings, delete, a painting.  You just never know.

So about a month ago, I pulled this out.  Now this is where the joy of digital painting comes about.  I had the base of this painting.  I had started it in Rebelle, a watercolor app for the computer.  So, I was able to pretty much go back to that.  There were a couple of areas I wanted too preserve.  I kept those.  Then just like magic, the painting came together.

I haven’t had a painting go this easily ever!  It just flowed.  Which, given that it gave me such fits for so long, I guess I deserved this.

If you look around, you can find all kinds of other faces.  There’s a guy in the upper left spewing out all kinds of garbage.  We all know that kind of person, right?

I had a blast making this painting.  I hope you enjoy looking at it.

As I said, I started this painting in Rebelle, where I start pretty much all my paintings. Then I took it into Painter 2017 to finish it.  I used brushes I made.  I made the brushes from dynamic speckle types.  If you want more details about the brushes, or want the brushes, contact me.